Spring Boot Maven Plugin
Spring Boot Maven Plugin
定制layers.xml
packaging.layers.configuration
通过构建定制layers.xml文件,可以控制打包后的jar文件中的内容,从而实现更细粒度的控制。结合spring-boot-maven-plugin,可以实现在打包时将不同类型的文件放置在不同的层中,配合SpringBoot efficient-images从而实现更高效的部署和管理。
<!-- POM.xml -->
<build>
        <finalName>${project.artifactId}</finalName>
        <plugins>
            <plugin>
                <groupId>org.springframework.boot</groupId>
                <artifactId>spring-boot-maven-plugin</artifactId>
                <version>${spring-boot.version}</version>
                <executions>
                    <execution>
                        <goals>
                            <goal>repackage</goal>
                        </goals>
                    </execution>
                </executions>
                <configuration>
                    <layers>
                        <enabled>true</enabled>
                        <configuration>${basedir}/src/main/resources/layers.xml</configuration>
                    </layers>
                </configuration>
            </plugin>
        </plugins>
    </build>
<layers xmlns="http://www.springframework.org/schema/boot/layers"
        xmlns:xsi="http://www.w3.org/2001/XMLSchema-instance"
        xsi:schemaLocation="http://www.springframework.org/schema/boot/layers
                          https://www.springframework.org/schema/boot/layers/layers-3.2.xsd">
    <!--application表示class和resource-->
    <application>
        <into layer="spring-boot-loader">
            <include>org/springframework/boot/loader/**</include>
        </into>
        <into layer="application"/>
    </application>

    <!--dependencies所有依赖-->
    <dependencies>
        <!--<into layer="application">
            <includeModuleDependencies/>
        </into>-->
        <into layer="snapshot-dependencies">
            <include>*:*:*SNAPSHOT</include>
        </into>
        <into layer="module-dependencies">
            <includeModuleDependencies/>
        </into>
        <!--<into layer="module-dependencies">
             <include>com.ruoyi:ruoyi-*:*</include>
         </into>-->
        <into layer="third-dependencies"/>
    </dependencies>

    <!--定义层顺序,会影响BOOT-INF/layers.idx-->
    <layerOrder>
        <!--这里到顺序会影响直接通过java -jar xxx.jar方式启动时的类加载顺序,而docker分层优化部署时的顺序不受影响。-->
        <layer>application</layer>
        <!--模块依赖-->
        <layer>module-dependencies</layer>
        <layer>third-dependencies</layer>
        <layer>spring-boot-loader</layer>
        <layer>snapshot-dependencies</layer>
    </layerOrder>
</layers>
classpath.idx
这是一个类路径索引文件,它包含了在构建过程中使用的所有类和资源的列表。这个文件通常由Maven插件生成,并包含在构建的JAR文件中。
官方解释:类路径索引文件可在 BOOT-INF/classpath.idx 中提供。通常,该文件由 Spring Boot 的 Maven 和 Gradle 构建插件自动生成。它提供了一个 jar 名称(包括目录)列表,并按照顺序将它们添加到 classpath 中。由构建插件生成时,该 classpath 排序与构建系统在运行和测试应用程序时使用的顺序一致。每行必须以破折号空格("--")开始,名称必须使用双引号。
该文件控制了类加载器的行为,它决定了类加载器在加载类和资源时的顺序。这个文件对于Spring Boot应用程序来说非常重要,因为它可以确保应用程序在运行时能够正确地加载类和资源。
过程分析
通过调试插件运行过程,可以发现:
- 在执行repackage方法时,会调用getLibraries方法,该方法会获取所有的库文件,并生成classpath.idx文件。相关代码如下:
// Packager
private void write(JarFile sourceJar, AbstractJarWriter writer, PackagedLibraries libraries) throws IOException {
		if (isLayered()) {
			writer.useLayers(this.layers, this.layersIndex);
		}
		writer.writeManifest(buildManifest(sourceJar));
		writeLoaderClasses(writer);
		writer.writeEntries(sourceJar, getEntityTransformer(), libraries.getUnpackHandler(),
				libraries.getLibraryLookup());
		Map<String, Library> writtenLibraries = libraries.write(writer);
		writeNativeImageArgFile(writer, sourceJar, writtenLibraries);
		if (isLayered()) {
			writeLayerIndex(writer);
		}
		writeSignatureFileIfNecessary(writtenLibraries, writer);
	}


Map<String, Library> write(AbstractJarWriter writer) throws IOException {
			Map<String, Library> writtenLibraries = new LinkedHashMap<>();
			for (Entry<String, Library> entry : this.libraries.entrySet()) {
				String path = entry.getKey();
				Library library = entry.getValue();
				if (library.isIncluded()) {
					String location = path.substring(0, path.lastIndexOf('/') + 1);
					writer.writeNestedLibrary(location, library);
					writtenLibraries.put(path, library);
				}
			}
      // 写入classpath.idx
			writeClasspathIndexIfNecessary(writtenLibraries.keySet(), getLayout(), writer);
			return writtenLibraries;
		}
- classpath.idx内容最初来自于maven生成的project对象中,相关代码如下:
// RepackageMojo
private void repackage() throws MojoExecutionException {
		Artifact source = getSourceArtifact(this.classifier);
		File target = getTargetFile(this.finalName, this.classifier, this.outputDirectory);
		Repackager repackager = getRepackager(source.getFile());
    // 获取所有的库文件
		Libraries libraries = getLibraries(this.requiresUnpack);
		try {
			LaunchScript launchScript = getLaunchScript();
			repackager.repackage(target, libraries, launchScript, parseOutputTimestamp());
		}
		catch (IOException ex) {
			throw new MojoExecutionException(ex.getMessage(), ex);
		}
		updateArtifact(source, target, repackager.getBackupFile());
	}

  protected final Libraries getLibraries(Collection<Dependency> unpacks) throws MojoExecutionException {
		Set<Artifact> artifacts = this.project.getArtifacts();
		Set<Artifact> includedArtifacts = filterDependencies(artifacts, getAdditionalFilters());
		return new ArtifactsLibraries(artifacts, includedArtifacts, this.session.getProjects(), unpacks, getLog());
	}
// MavenProject
public Set<Artifact> getArtifacts() {
    if (artifacts == null) {
        if (artifactFilter == null || resolvedArtifacts == null) {
            artifacts = new LinkedHashSet<>();
        } else {
            artifacts = new LinkedHashSet<>(resolvedArtifacts.size() * 2);
            for (Artifact artifact : resolvedArtifacts) {
                if (artifactFilter.include(artifact)) {
                    artifacts.add(artifact);
                }
            }
        }
    }
    return artifacts;
}
- maven又是如何获取到这些库文件的,相关代码如下:
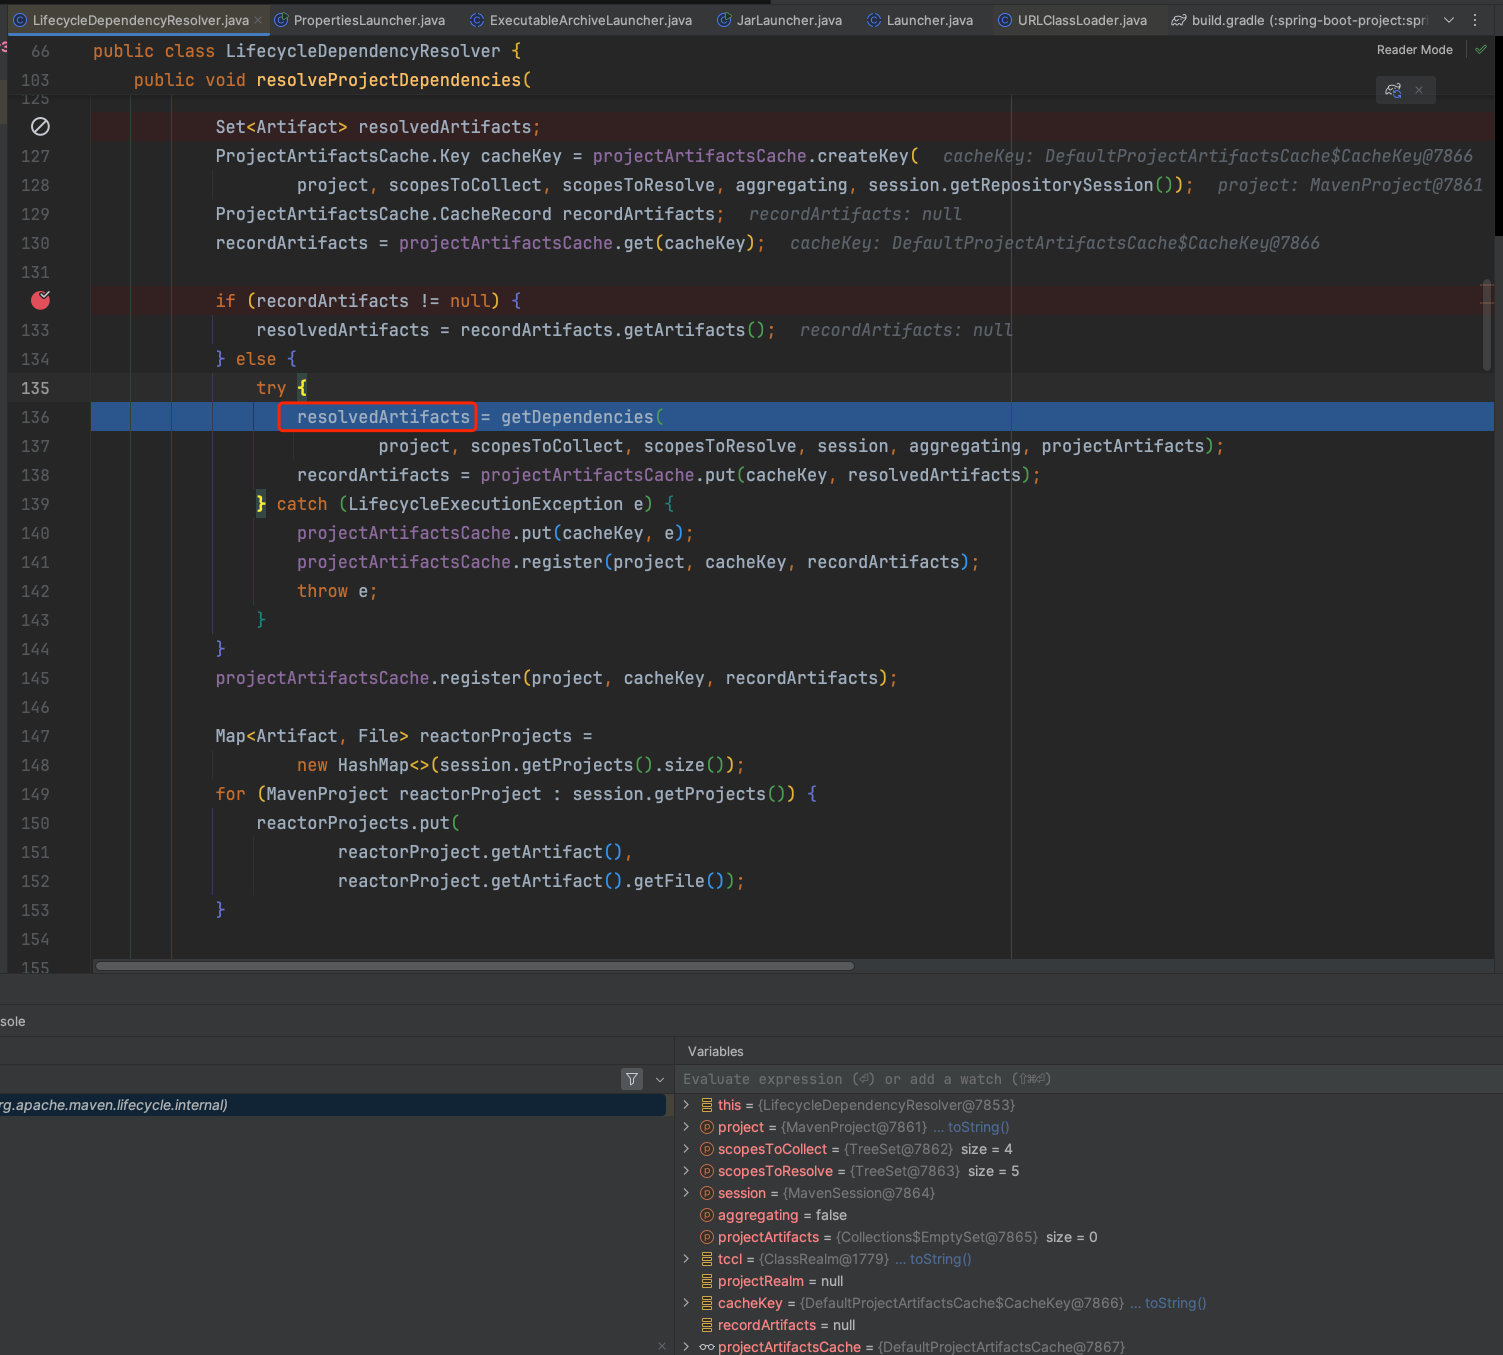
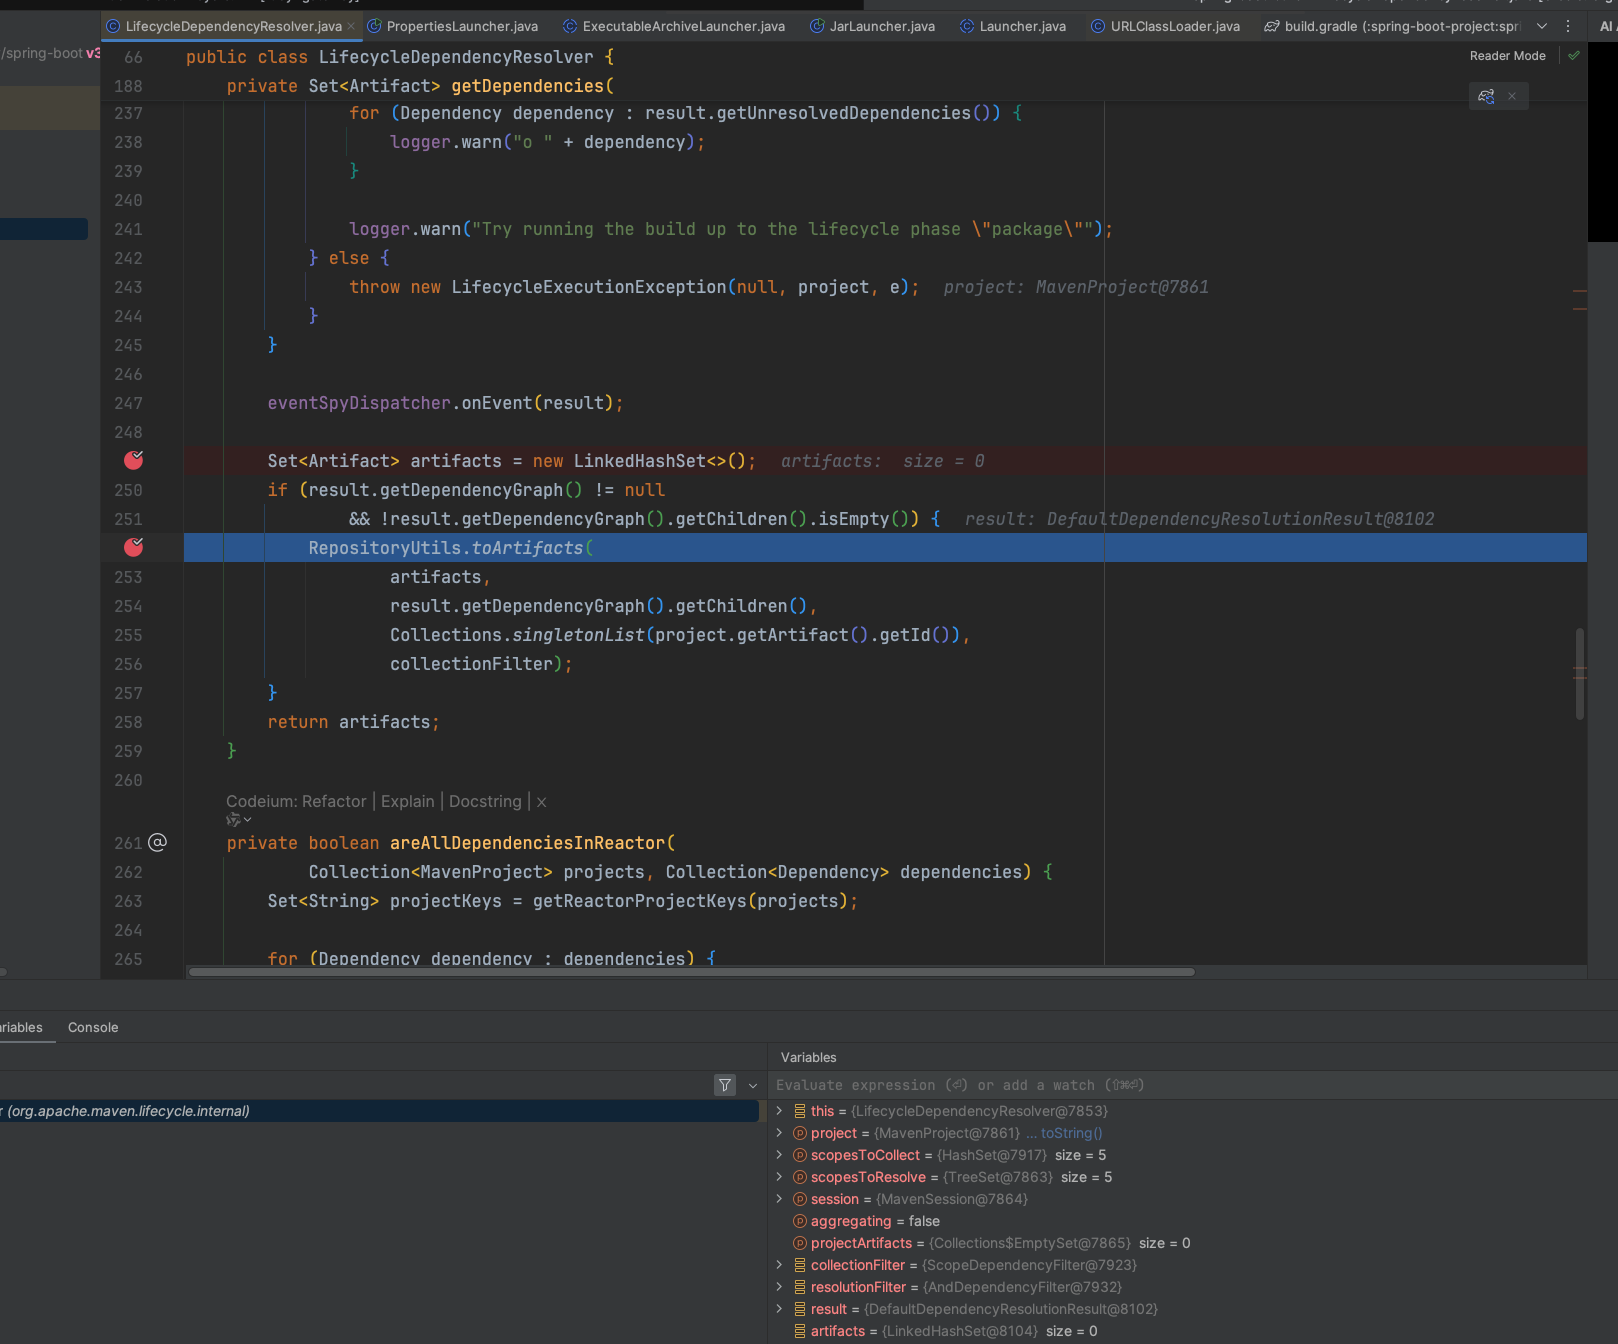
从toArtifacts代码分析,maven在解析依赖时,会遍历所有的直接依赖,然后把它们的依赖分别进行递归调用toArtifacts方法:
jar的顺序和pom中依赖的顺序一致
// RepositoryUtils
public static void toArtifacts(
        Collection<org.apache.maven.artifact.Artifact> artifacts,
        Collection<? extends DependencyNode> nodes,
        List<String> trail,
        DependencyFilter filter) {
    for (DependencyNode node : nodes) {
        org.apache.maven.artifact.Artifact artifact = toArtifact(node.getDependency());

        List<String> nodeTrail = new ArrayList<>(trail.size() + 1);
        nodeTrail.addAll(trail);
        nodeTrail.add(artifact.getId());

        if (filter == null || filter.accept(node, Collections.<DependencyNode>emptyList())) {
            artifact.setDependencyTrail(nodeTrail);
            artifacts.add(artifact);
        }

        toArtifacts(artifacts, node.getChildren(), nodeTrail, filter);
    }
}
调试
准备
- 下载插件源码,IDEA导入
git clone https://github.com/spring-projects/spring-boot
# 切换需要调试的版本
git checkout v3.2.8
准备好测试项目,配置需要测试的插件 ,如spring-boot-maven-plugin,配置参考上方内容
两个项目JDK和Maven版本保持一致
执行
- 打断点
在源码项目中通过搜索@Mojo(name = "repackage"找到对应的核心类,在execute()方法打上断点

- 在测试项目控制台中执行
${maven_home}/mvnDebug clean package开启调试模式,等待IDEA连接,复制控制台输出的端口号
mvnDebug clean package

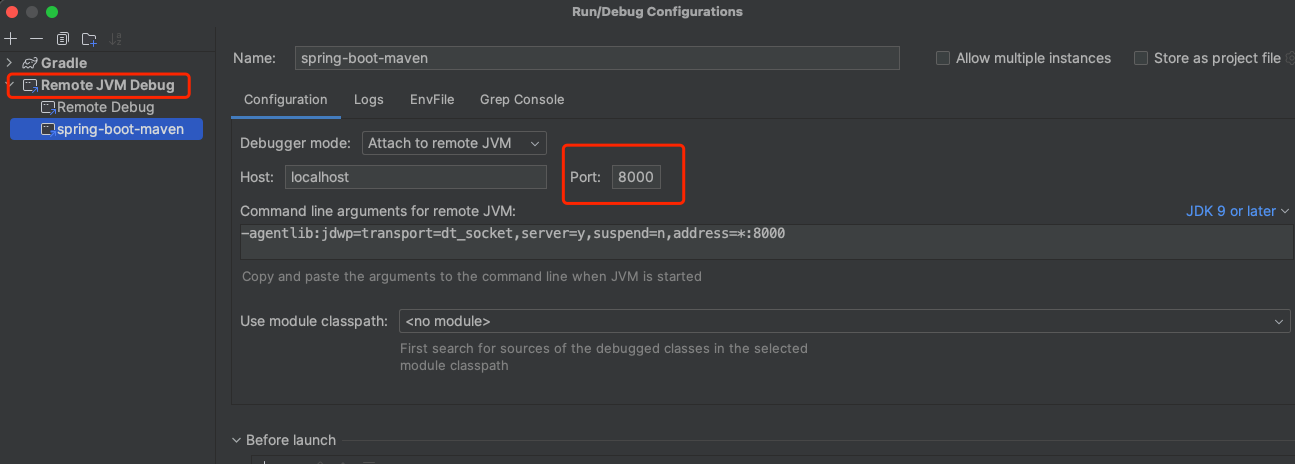
- 配置远程调试
在源码项目新建远程调试并且启动,端口为上一步复制的端口号,等待将进入断点